Keras图片增强
CNN中图片具有平移不变形,旋转不变形,如下图,而在实际应用中训练数据常常不足, 或不均衡, 因此我们可以通过增强数据,扩展训练集。
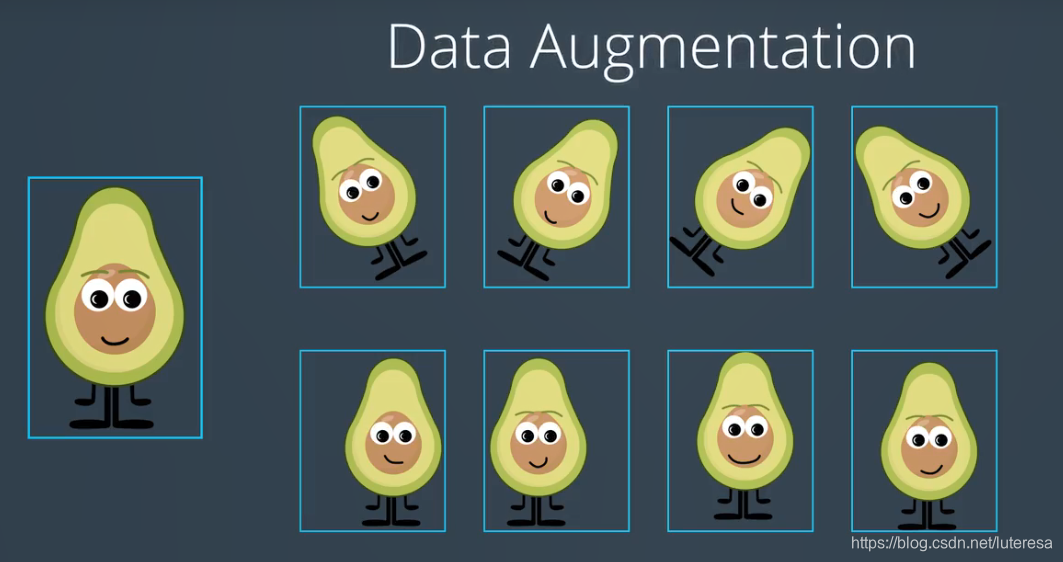
我们可以对现有的数据,进行平移、翻转、旋转、缩放、亮度增强等操作,以生成新的图片来参与训练或测试。
这种操作可以将图片数量提升数倍,由此大大降低了过拟合的可能,因为模型训练了更多的图片,有更好的泛化。
实际上经验,图像增强中使用旋转、翻转,效果不错;
https://keras.io/preprocessing/image/
https://keras-cn.readthedocs.io/en/latest/preprocessing/image/
https://machinelearningmastery.com/image-augmentation-deep-learning-keras/
https://blog.keras.io/building-powerful-image-classification-models-using-very-little-data.html
Keras中数据增强的类:ImageDataGenerator
keras.preprocessing.image.ImageDataGenerator(featurewise_center=False,
    samplewise_center=False,
    featurewise_std_normalization=False,
    samplewise_std_normalization=False,
    zca_whitening=False,
    zca_epsilon=1e-6,
    rotation_range=0.,
    width_shift_range=0.,
    height_shift_range=0.,
    shear_range=0.,
    zoom_range=0.,
    channel_shift_range=0.,
    fill_mode='nearest',
    cval=0.,
    horizontal_flip=False,
    vertical_flip=False,
    rescale=None,
    preprocessing_function=None,
    data_format=K.image_data_format())
参数
featurewise_center:布尔值,使输入数据集去中心化(均值为0), 按feature执行
samplewise_center:布尔值,使输入数据的每个样本均值为0
featurewise_std_normalization:布尔值,将输入除以数据集的标准差以完成标准化, 按feature执行
samplewise_std_normalization:布尔值,将输入的每个样本除以其自身的标准差
zca_whitening:布尔值,对输入数据施加ZCA白化
zca_epsilon: ZCA使用的eposilon,默认1e-6
rotation_range:整数,数据提升时图片随机转动的角度
width_shift_range:浮点数,图片宽度的某个比例,数据提升时图片水平偏移的幅度
height_shift_range:浮点数,图片高度的某个比例,数据提升时图片竖直偏移的幅度
shear_range:浮点数,剪切强度(逆时针方向的剪切变换角度)
zoom_range:浮点数或形如[lower,upper]的列表,随机缩放的幅度,若为浮点数,则相当于[lower,upper] = [1 - zoom_range, 1+zoom_range]
channel_shift_range:浮点数,随机通道偏移的幅度
fill_mode:;‘constant’,‘nearest’,‘reflect’或‘wrap’之一,当进行变换时超出边界的点将根据本参数给定的方法进行处理
cval:浮点数或整数,当fill_mode=constant时,指定要向超出边界的点填充的值
horizontal_flip:布尔值,进行随机水平翻转
vertical_flip:布尔值,进行随机竖直翻转
rescale: 重放缩因子,默认为None. 如果为None或0则不进行放缩,否则会将该数值乘到数据上(在应用其他变换之前)
preprocessing_function: 将被应用于每个输入的函数。该函数将在图片缩放和数据提升之后运行。该函数接受一个参数,为一张图片(秩为3的numpy array),并且输出一个具有相同shape的numpy array
data_format:字符串,“channel_first”或“channel_last”之一,代表图像的通道维的位置。该参数是Keras 1.x中的image_dim_ordering,“channel_last”对应原本的“tf”,“channel_first”对应原本的“th”。以128x128的RGB图像为例,“channel_first”应将数据组织为(3,128,128),而“channel_last”应将数据组织为(128,128,3)。该参数的默认值是~/.keras/keras.json中设置的值,若从未设置过,则为“channel_last”
方法
fit(x, augment=False, rounds=1):计算依赖于数据的变换所需要的统计信息(均值方差等),只有使用featurewise_center,featurewise_std_normalization或zca_whitening时需要此函数。
X:numpy array,样本数据,秩应为4.在黑白图像的情况下channel轴的值为1,在彩色图像情况下值为3
augment:布尔值,确定是否使用随即提升过的数据
round:若设augment=True,确定要在数据上进行多少轮数据提升,默认值为1
seed: 整数,随机数种子
flow(self, X, y, batch_size=32, shuffle=True, seed=None, save_to_dir=None, save_prefix='', save_format='png'):接收numpy数组和标签为参数,生成经过数据提升或标准化后的batch数据,并在一个无限循环中不断的返回batch数据
x:样本数据,秩应为4.在黑白图像的情况下channel轴的值为1,在彩色图像情况下值为3
y:标签
batch_size:整数,默认32
shuffle:布尔值,是否随机打乱数据,默认为True
save_to_dir:None或字符串,该参数能让你将提升后的图片保存起来,用以可视化
save_prefix:字符串,保存提升后图片时使用的前缀, 仅当设置了save_to_dir时生效
save_format:"png"或"jpeg"之一,指定保存图片的数据格式,默认"jpeg"
yields:形如(x,y)的tuple,x是代表图像数据的numpy数组.y是代表标签的numpy数组.该迭代器无限循环.
seed: 整数,随机数种子
flow_from_directory(directory): 以文件夹路径为参数,生成经过数据提升/归一化后的数据,在一个无限循环中无限产生batch数据
directory: 目标文件夹路径,对于每一个类,该文件夹都要包含一个子文件夹.子文件夹中任何JPG、PNG、BNP、PPM的图片都会被生成器使用.详情请查看此脚本
target_size: 整数tuple,默认为(256, 256). 图像将被resize成该尺寸
color_mode: 颜色模式,为"grayscale","rgb"之一,默认为"rgb".代表这些图片是否会被转换为单通道或三通道的图片.
classes: 可选参数,为子文件夹的列表,如['dogs','cats']默认为None. 若未提供,则该类别列表将从directory下的子文件夹名称/结构自动推断。每一个子文件夹都会被认为是一个新的类。(类别的顺序将按照字母表顺序映射到标签值)。通过属性class_indices可获得文件夹名与类的序号的对应字典。
class_mode: "categorical", "binary", "sparse"或None之一. 默认为"categorical. 该参数决定了返回的标签数组的形式, "categorical"会返回2D的one-hot编码标签,"binary"返回1D的二值标签."sparse"返回1D的整数标签,如果为None则不返回任何标签, 生成器将仅仅生成batch数据, 这种情况在使用
model.predict_generator()和model.evaluate_generator()等函数时会用到.
batch_size: batch数据的大小,默认32
shuffle: 是否打乱数据,默认为True
seed: 可选参数,打乱数据和进行变换时的随机数种子
save_to_dir: None或字符串,该参数能让你将提升后的图片保存起来,用以可视化
save_prefix:字符串,保存提升后图片时使用的前缀, 仅当设置了save_to_dir时生效
save_format:"png"或"jpeg"之一,指定保存图片的数据格式,默认"jpeg"
flollow_links: 是否访问子文件夹中的软链接
1.ImageDataGenerator数据增强方法
from numpy import expand_dims
from keras.preprocessing.image import load_img
from keras.preprocessing.image import img_to_array
from keras.preprocessing.image import ImageDataGenerator
from matplotlib import pyplot
from PIL import Image
import numpy as np
from keras.preprocessing import image
import keras as K
# load the image
img = image.load_img('bird.jpg')
print(img)
# convert to numpy array
data = image.img_to_array(img)
print(data.shape)
pyplot.imshow(img)
(399, 640, 3)

# expand dimension to one sample
samples = expand_dims(data, 0)
print(samples.shape)
(1, 399, 640, 3)1.1 随机平移
移动范围可以用像素点,也可以用0~1浮点数,表示移动比例
# create image data augmentation generator
#datagen = ImageDataGenerator(width_shift_range=[-200,200])
datagen = ImageDataGenerator(width_shift_range=0.5,height_shift_range=0.5)

# prepare iterator
it = datagen.flow(samples, batch_size=1)
# generate samples and plot
for i in range(9):
    # define subplot
    pyplot.subplot(330 + 1 + i)
    # generate batch of images
    batch = it.next()
    # convert to unsigned integers for viewing
    image = batch[0].astype('uint8')
    # plot raw pixel data
    pyplot.imshow(image)
    # show the figure
pyplot.show()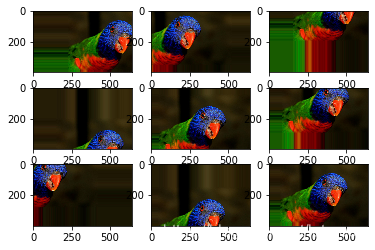
1.2 水平或垂直翻转
# create image data augmentation generator
datagen = ImageDataGenerator(horizontal_flip=True,vertical_flip=True)

# prepare iterator
it = datagen.flow(samples, batch_size=1)
# generate samples and plot
for i in range(9):
    # define subplot
    pyplot.subplot(330 + 1 + i)
    # generate batch of images
    batch = it.next()
    # convert to unsigned integers for viewing
    image = batch[0].astype('uint8')
    # plot raw pixel data
    pyplot.imshow(image)
    # show the figure
pyplot.show()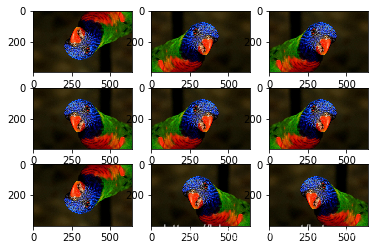
1.3 随机旋转
参数为最大旋转角度
# create image data augmentation generator
datagen = ImageDataGenerator(rotation_range=45)

# prepare iterator
it = datagen.flow(samples, batch_size=1)
# generate samples and plot
for i in range(9):
    # define subplot
    pyplot.subplot(330 + 1 + i)
    # generate batch of images
    batch = it.next()
    # convert to unsigned integers for viewing
    image = batch[0].astype('uint8')
    # plot raw pixel data
    pyplot.imshow(image)
    # show the figure
pyplot.show()
1.4 随机亮度变化
小于1.0表示变暗,大于1.0变亮,1.0不变
# create image data augmentation generator
datagen = ImageDataGenerator(brightness_range=[0.2,5.0])

# prepare iterator
it = datagen.flow(samples, batch_size=1)
# generate samples and plot
for i in range(9):
    # define subplot
    pyplot.subplot(330 + 1 + i)
    # generate batch of images
    batch = it.next()
    # convert to unsigned integers for viewing
    image = batch[0].astype('uint8')
    # plot raw pixel data
    pyplot.imshow(image)
    # show the figure
pyplot.show()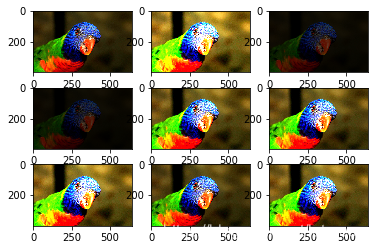
1.5 随机变焦
参数表示缩小,放大的最大范围
# create image data augmentation generator
datagen = ImageDataGenerator(zoom_range=[0.5,1.0])

# prepare iterator
it = datagen.flow(samples, batch_size=1)
# generate samples and plot
for i in range(9):
    # define subplot
    pyplot.subplot(330 + 1 + i)
    # generate batch of images
    batch = it.next()
    # convert to unsigned integers for viewing
    image = batch[0].astype('uint8')
    # plot raw pixel data
    pyplot.imshow(image)
    # show the figure
pyplot.show()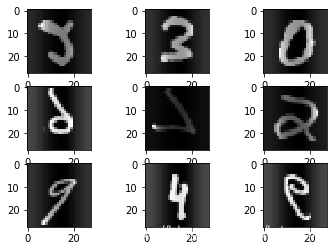
2 在实际训练场景中,数据增强技术的运用
1.图片来源于已知数据集,如mnist;
2.图片来源于普通图片,如本地的jpg,png等;
3.图片来源于panda数据集;
2.1 数据来源已知数据集,操作方法如下:
数据集已经全部读到内存中
from keras.datasets import mnist
from keras.preprocessing.image import ImageDataGenerator
from matplotlib import pyplot
from keras import backend as K

#K.set_image_dim_ordering('th')

(train_data, train_label), (test_data, test_label) = mnist.load_data()
train_data = train_data.reshape(train_data.shape[0], 1, 28, 28)
train_data = train_data.astype('float32')

# 创建图像生成器,指定对图像操作的内容,允许图片标准化处理
datagen = ImageDataGenerator(featurewise_center=True, featurewise_std_normalization=True, horizontal_flip=True)
# 图像生成器要训练的数据,计算均值,方差等
datagen.fit(train_data)

# 这是个图像生成迭代器,是可以无限生成各种新图片,这里指定每轮迭代只生成9张图片
for batch_data, batch_label in datagen.flow(train_data, train_label, batch_size=9):
    for i in range(0, 9):
        # 创建一个 3*3的九宫格,以显示图片
        pyplot.subplot(330 + 1 + i)
        pyplot.imshow(batch_data[i].reshape(28, 28), cmap=pyplot.get_cmap('gray'))
    pyplot.show()
    break
2.2数据来源图片集,其操作方法如下:
实际应用中,大部分场景是从硬盘读取图片,并且图片太多,不可能一次性都读到硬盘,那么可以对传入的目录,随机读取并且做数据增广
1.对已经读取到内存的单张图片数据(数组),做随机增广
可以为单个类别创建augment_times个增广图片
from numpy import expand_dims
from keras.preprocessing.image import load_img
from keras.preprocessing.image import img_to_array
from keras.preprocessing.image import ImageDataGenerator
from matplotlib import pyplot
from PIL import Image
import numpy as np
from keras.preprocessing import image
import keras as K

# load the image
img = image.load_img('bird.jpg')
print(img)
# convert to numpy array
data_bird = image.img_to_array(img)
print(data_bird.shape)

pyplot.imshow(img)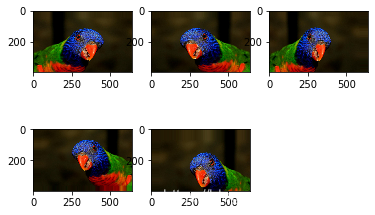
data_gen = ImageDataGenerator(
    rescale = .1, # TODO:随机缩放图像RGB值的倍数
    rotation_range =0.15 , # TODO:随机旋转图像的范围
    zoom_range = 0.1,  # TODO:随机缩放图像大小范围
    width_shift_range = 0.2,  # TODO:随机水平方向平移图像(fraction of total width)
    height_shift_range= 0.2,  # TODO:随机纵向平移图像(fraction of total height)
    horizontal_flip=True,
)
augment_times = 5
data_x = []
data_y = []
i = 0
for _ in range(augment_times):
face_aug = data_gen.random_transform(data_bird)
data_x.append(face_aug)
#data_y.append(name_dict[subdir])
plt.subplot(2,3,1+i)
plt.imshow(array_to_img(face_aug))#
i = i+1
2从目录随机读取所有类别图片,做数据增广
详细功能解释见代码注释
ps:实测发现迭代器产生图片的
#需要说明的是,这些增强图片都是在内存中实时批量迭代生成的,不是一次性被读入内存,这样可以极大地节约内存空间,加快处理速度。若想保留中间过程生成的增强图片,可以在上述方法中添加保存路径等参数,此处不再赘述。
import matplotlib.pyplot as plt

batch_size = 32
# 迭代50次
epochs = 50
# 依照模型规定,图片大小被设定为224
IMAGE_SIZE = 224

TRAIN_PATH = './data/17flowerclasses/train'
TEST_PATH = './data/17flowerclasses/test'

FLOWER_CLASSES = ['Bluebell', 'ButterCup', 'ColtsFoot']

# 使用数据增强
train_datagen = ImageDataGenerator(rotation_range=90)
# 可指定输出图片大小,因为深度学习要求训练图片大小保持一致
train_generator = train_datagen.flow_from_directory(directory=TRAIN_PATH,
                                                        target_size=(IMAGE_SIZE, IMAGE_SIZE),
                                                        classes=FLOWER_CLASSES)

from keras.preprocessing.image import ImageDataGenerator, array_to_img, img_to_array, load_img
import numpy as np
datagen = ImageDataGenerator(
        rotation_range=40,
        width_shift_range=0.2,
        height_shift_range=0.2,
        shear_range=0.2,
        zoom_range=0.2,
        horizontal_flip=True,
        fill_mode='nearest')
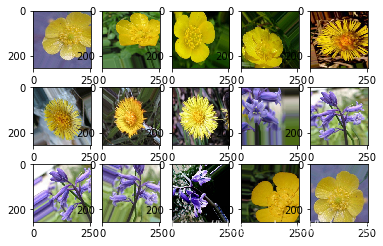
# 这里因为设置了save_to_dir参数,实际会保存所有增广图片到save_to_dir目录
dataflow_generator=datagen.flow_from_directory(r'./data/17flowerclasses/train',#类别子文件夹的上一级文件夹
                                         batch_size=6,
                                         shuffle=False,
                                         save_to_dir=r'./train_result',
                                         save_prefix='trans_',
                                         save_format='jpg')
filenames = dataflow_generator.filenames
labels = dataflow_generator.class_indices
print(filenames)

#dataflow_generator实际上是一个无限迭代器
for i in range(1):
    dataflow_generator.next()
sample_count = 10
i = 0

#此处image_data是一个2xlen(image_data[1])序列,
#image_data[0][...]存放batch_size张图片
#image_data[1][...]存放batch_size对应标签,默认自动创建为独热编码标签

for image_data in dataflow_generator:
    print(len(image_data[1]))
    for j in range(0,len(image_data[1])):
        if i >= 15:
            break
        plt.subplot(3,5,1+i)
        image = image_data[0][j].astype('uint8')
        #print(type(image_data))
        plt.imshow(array_to_img(image))#图片转化为image格式,方便显示
        #plt.imshow(image)
        i += 1
        print(image_data[1][j])          #label
        #print(image_data[0][0].shape) #image

    sample_count -= 1
    if sample_count <= 0:
        break
Found 14 images belonging to 3 classes.
Found 14 images belonging to 3 classes.
['Bluebell/image_0241.jpg', 'Bluebell/image_0242.jpg', 'Bluebell/image_0243.jpg', 'Bluebell/image_0244.jpg', 'Bluebell/image_0245.jpg', 'ButterCup/image_1121.jpg', 'ButterCup/image_1122.jpg', 'ButterCup/image_1123.jpg', 'ButterCup/image_1124.jpg', 'ButterCup/image_1125.jpg', 'ColtsFoot/image_0881.jpg', 'ColtsFoot/image_0882.jpg', 'ColtsFoot/image_0883.jpg', 'ColtsFoot/image_0884.jpg']
6
[0. 1. 0.]
[0. 1. 0.]
[0. 1. 0.]
[0. 1. 0.]
[0. 0. 1.]
[0. 0. 1.]
2
[0. 0. 1.]
[0. 0. 1.]
6
[1. 0. 0.]
[1. 0. 0.]
[1. 0. 0.]
[1. 0. 0.]
[1. 0. 0.]
[0. 1. 0.]
6
[0. 1. 0.]
2
6
6
2
6
6
举一个从硬盘读取图片做数据增广多分类的实例
import csv
import cv2
import numpy as np
import matplotlib.pyplot as plt
from sklearn.model_selection import train_test_split
import pandas as pd

import sklearn
import os
import random

import tensorflow as tf
BATCH_SIZE = 16
# 迭代50次
EPOCHS = 10
# 依照模型规定,图片大小被设定为224
IMAGE_SIZE = 224
TRAIN_PATH = './17flowerclasses/train'
TEST_PATH = './17flowerclasses/test'
FLOWER_CLASSES = ['Bluebell', 'ButterCup', 'ColtsFoot', 'Cowslip', 'Crocus', 'Daffodil', 'Daisy','Dandelion', 'Fritillary', 'Iris', 'LilyValley', 'Pansy', 'Snowdrop', 'Sunflower','Tigerlily', 'tulip', 'WindFlower']
# 使用数据增强
train_datagen = ImageDataGenerator(
rotation_range=40,
width_shift_range=0.2,
height_shift_range=0.2,
shear_range=0.2,
zoom_range=0.2,
horizontal_flip=True,
fill_mode='nearest')
# 可指定输出图片大小,因为深度学习要求训练图片大小保持一致
train_generator = train_datagen.flow_from_directory(directory=TRAIN_PATH,
target_size=(IMAGE_SIZE, IMAGE_SIZE),
batch_size = BATCH_SIZE,
classes=FLOWER_CLASSES)
test_datagen = ImageDataGenerator()
test_generator = test_datagen.flow_from_directory(directory=TEST_PATH,
target_size=(IMAGE_SIZE, IMAGE_SIZE),
classes=FLOWER_CLASSES)
Found 1190 images belonging to 17 classes.
Found 170 images belonging to 17 classes.
from keras.layers import Conv2D, MaxPooling2D, GlobalAveragePooling2D
from keras.layers import Dropout, Flatten, Dense
from keras.models import Sequential
model = Sequential()
### TODO: 定义你的网络架构
model.add(Conv2D(filters=32, kernel_size=3, padding='valid', activation='relu', input_shape=(224, 224, 3)))
#model.add(Conv2D(32, (3,3), input_shape=(160, 160, 3), activation="relu"))
model.add(MaxPooling2D(pool_size=2))
#model.add(MaxPooling2D(pool_size=(2,2)))
model.add(Dropout(0.5))
model.add(Conv2D(filters=64, kernel_size=3, padding='valid', activation='relu'))
model.add(MaxPooling2D(pool_size=2))
model.add(Dropout(0.5))
model.add(Conv2D(filters=128, kernel_size=3, padding='valid', activation='relu'))
model.add(GlobalAveragePooling2D())
model.add(Dropout(0.5))
model.add(Dense(17, activation='softmax'))
model.summary()Model: "sequential_18"
_________________________________________________________________
Layer (type) Output Shape Param #
=================================================================
conv2d_52 (Conv2D) (None, 222, 222, 32) 896
_________________________________________________________________
max_pooling2d_38 (MaxPooling (None, 111, 111, 32) 0
_________________________________________________________________
dropout_49 (Dropout) (None, 111, 111, 32) 0
_________________________________________________________________
conv2d_53 (Conv2D) (None, 109, 109, 64) 18496
_________________________________________________________________
max_pooling2d_39 (MaxPooling (None, 54, 54, 64) 0
_________________________________________________________________
dropout_50 (Dropout) (None, 54, 54, 64) 0
_________________________________________________________________
conv2d_54 (Conv2D) (None, 52, 52, 128) 73856
_________________________________________________________________
global_average_pooling2d_15 (None, 128) 0
_________________________________________________________________
dropout_51 (Dropout) (None, 128) 0
_________________________________________________________________
dense_21 (Dense) (None, 17) 2193
=================================================================
Total params: 95,441
Trainable params: 95,441
Non-trainable params: 0
_________________________________________________________________
from keras.callbacks import ModelCheckpoint

# train the model
checkpointer = ModelCheckpoint(filepath='flowers.weights.best.hdf5', verbose=1,
                               save_best_only=True)

model.compile(optimizer='rmsprop',loss='categorical_crossentropy', metrics=['accuracy'])
#model.fit(X_train,y_train,validation_split=0.2,shuffle=True,epochs=20)
history_object = model.fit_generator(train_generator,validation_data=test_generator, epochs=EPOCHS)Epoch 1/10
75/75 [==============================] - 29s 383ms/step - loss: 7.8649 - accuracy: 0.0849 - val_loss: 2.3924 - val_accuracy: 0.1176
Epoch 2/10
75/75 [==============================] - 28s 379ms/step - loss: 2.5159 - accuracy: 0.1689 - val_loss: 2.5512 - val_accuracy: 0.2471
Epoch 3/10
75/75 [==============================] - 28s 377ms/step - loss: 2.3332 - accuracy: 0.2563 - val_loss: 2.0680 - val_accuracy: 0.3000
Epoch 4/10
75/75 [==============================] - 28s 377ms/step - loss: 2.2113 - accuracy: 0.2866 - val_loss: 2.2407 - val_accuracy: 0.3059
Epoch 5/10
75/75 [==============================] - 28s 377ms/step - loss: 2.0356 - accuracy: 0.3244 - val_loss: 2.4963 - val_accuracy: 0.2941
Epoch 6/10
75/75 [==============================] - 29s 380ms/step - loss: 2.0376 - accuracy: 0.3403 - val_loss: 1.7107 - val_accuracy: 0.3588
Epoch 7/10
75/75 [==============================] - 30s 407ms/step - loss: 1.9415 - accuracy: 0.3689 - val_loss: 2.1597 - val_accuracy: 0.3118
Epoch 8/10
75/75 [==============================] - 32s 421ms/step - loss: 1.9102 - accuracy: 0.3571 - val_loss: 1.8596 - val_accuracy: 0.3353
Epoch 9/10
75/75 [==============================] - 31s 416ms/step - loss: 1.8563 - accuracy: 0.3975 - val_loss: 2.3684 - val_accuracy: 0.3235
Epoch 10/10
75/75 [==============================] - 31s 415ms/step - loss: 1.8305 - accuracy: 0.4202 - val_loss: 2.0994 - val_accuracy: 0.4118